Creating your first Tonto Model
After installing the VS Code extension, it's time to experiment creating your first tonto model. In order to learn more about how Tonto represents OntoUML constructs, we will create a model related to the University environment.
Package declaration
The first declaration in a Tonto specification is equivalent to the definition of a package in UML/OntoUML, using the keyword package. It establishes that all the declarations within a file belong to the named package at the top of a file. After the package name, we have a set of declaration statements. Every statement can be either: (i) a class declaration or (ii) an auxiliary declaration.
Create your first tonto file named personPhases.tonto. Every tonto file contains a package, and the name declaration of that package must come at the beginning of the file. In order to declare your first package, create a file named personPhases.tonto and write the following line:
package PersonPhases
Every other declaration must come after the package declaration.
Class declaration
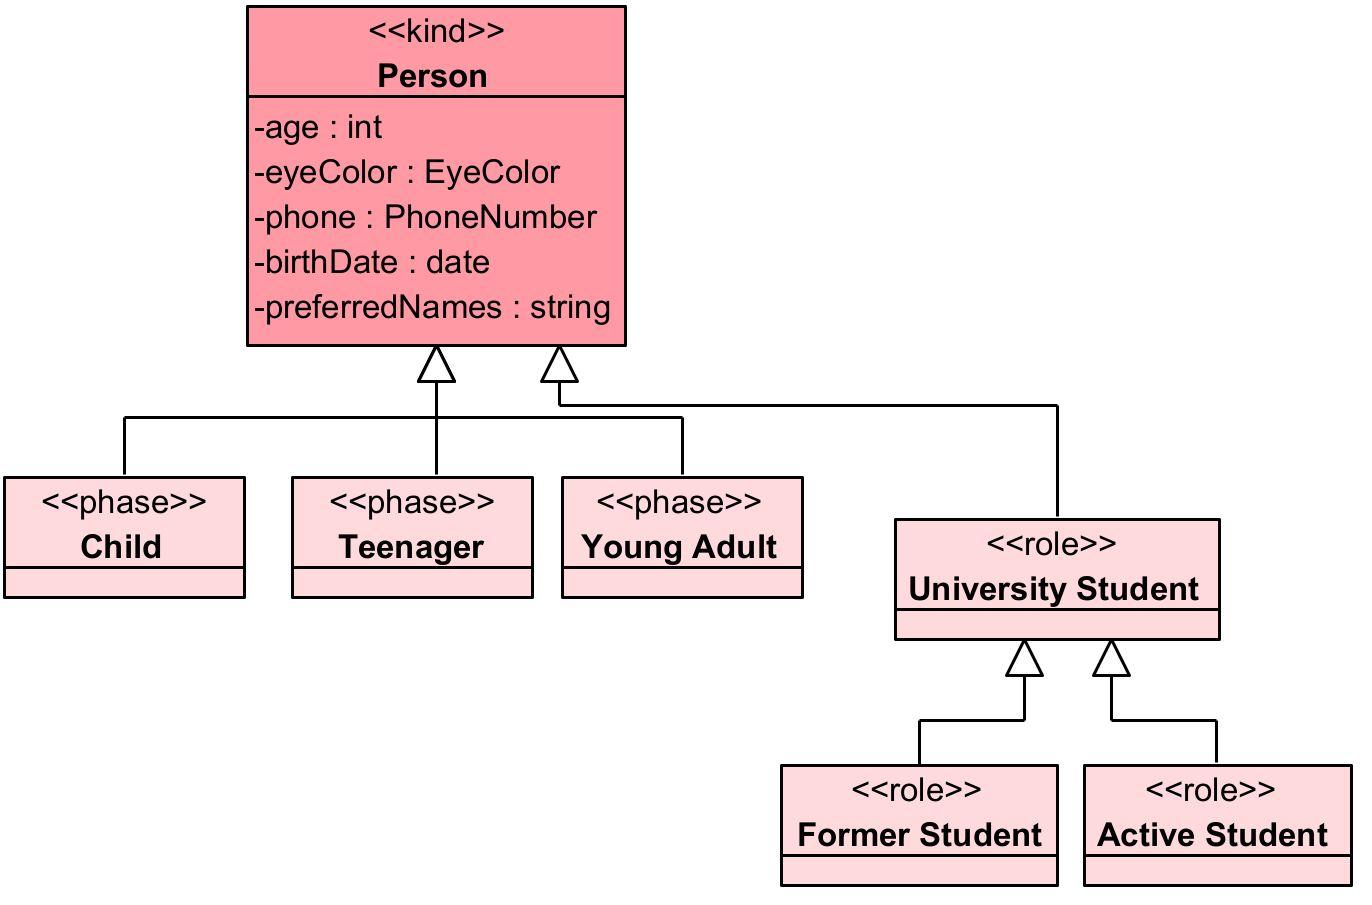
Following OntoUML stereotypes, Tonto allows the creation of classes with the same stereotypes. Every class declaration follows the idea of declarations in popular programming languages like Java, where we have a keyword for the type of the element followed by its name or identifier. In the following figure we have a piece of an OntoUML model for a domain involving persons, some of their phases of life and possible roles. The class Person is stereotyped <<kind>> and includes some attributes that we will address later in this tutorial. The classes Child, Teenager and Young Adult are (incomplete) phases of a person's life and have the stereotype <<phase>>.

Figure 1 - Example model representing a person's life stages and a possible role as a student, built in the OntoUML plugin of Visual Paradigm tool.
The Tonto equivalent to that diagram would be the following code, that you can add to the personPhases.tonto file.
package PersonPhases

kind Person

phase Child specializes Person
phase Teenager specializes Person
phase YoungAdult specializes Person

role UniversityStudent specializes Person
role FormerStudent specializes UniversityStudent
role ActiveStudent specializes UniversityStudent
As we can see, a generalization in OntoUML can be declared utilizing the keyword specializes after the class declaration name, followed by the name of the parent class.
Attributes Declaration
Now, we need to declare the attributes encountered in the kind Person, however, not all datatypes are present in Tonto. By default, Tonto has the following datatypes:
- number
- string
- boolean
- date
- time
- datetime
We don't have pre-defined datatypes for int, EyeColor, and PhoneNumber, so we need to define them in order to be able to use them. Then, you can add at the beginning of the PersonPhases package the needed datatypes.
The first element is the datatype PhoneNumber, which contains a country code and a body number properties. Both of these properties are of type int, and have a cardinality of one to one. The second element is the datatype int, and we define it as a specialization of the base datatype number. This representation is only nominal, and Tonto does not apply any specific limitation to validate that the number is an integer.
The last element is of a specific kind of datatype, an enumeration. In enumerations, we have literals declared inside it, and when we define an attribute datatype as an enumeration, the meaning is that a value of this datatype is one of the possible literals defined. In this case, the eye color could be blue, green, brown, or black.
datatype PhoneNumber {
    countryCode: int [1]
    bodyNumber: int [1]
}

datatype int specializes number

enum EyeColor {
    Blue,
    Green,
    Brown,
    Black
}
Finally, we can add the attributes of the kind Person. Each attribute has their own name, type and cardinality defined. In addition, the attributes can have meta-properties defined inside of brackets at the end of the attribute declaration.
kind Person {
    name: string [1]
    preferredNames: string [1..*] { ordered }
    age: number [1]
    birthDate: date [1] { const }
    eyeColor: EyeColor [1..2]
    phoneNumber: PhoneNumber [0..*]
}
Now you have your first Tonto Model! Continue following the tutorial to understand more about Tonto.